A Plum By Any Other Name

  • Stories
  • About
  • Recipes
  • Images
image1-2.jpeg

Sourdough at Sea Level

March 11, 2018 by Emily Gelsomin in For Herbivores

Learning how to bake bread is like wanting to climb a really big mountain.  You do it because it is there.  Because you can.  Because it is a challenge.  And also because you are a slightly insane person.

I have spent a good portion of my thirties refining how to make bread at home. For many years, I practiced a beautiful technique from Tartine that took all day.  Initially, it was romantic starting the process soon after the sun came up and eating it after the sun went down.  But this is really best suited for home cooks who do not like other humans very much, since it does not allow for much interaction outside of a rigorous yeast feeding cycle.  

I still use that recipe when I have the better part of a day to spare indoors.  It is excellent on wintry bomb cyclone days or when I do not want to leave my house (or shower).  But the older I get, the less time I am typically willing to part with tending to sourdough and sticky countertops as the rest of the world spins on. So, mostly, I use an alternative method, with some techniques borrowed from the recipe that time forgot.

My approach comes from The New York Times by way of Jim Lahey of the no-knead bread fame. Lahey initially got me into making bread because it was easy. His original recipe calls for dry yeast, but my acquisition of sourdough starter about five years ago left the no-knead version defunct. Sam Sifton has since adapted it using natural leaven and this has been life changing.

We have access to a variety of freshly baked loaves and many okay factory-sliced breads, so no one should be faulted for saving precious minutes buying bread instead of baking it.  But paying five or six dollars for a decent loaf seemed outrageous, given a sack of flour costs about as much. So I set out to make bread with minimal life disruption.

There is a good deal of sandwich-making in our household these days.  Peanut butter on toast is cheap, filling, and nutritious.  (Please do not contact me if you are morally opposed to gluten, I am not.) We go through a lot of bread and so having a regimen is helpful.

I have learned that if I feed the starter at bedtime and take five minutes to mix the dough in the morning before work, it is sated with carbon dioxide when I get home.  The loaf still requires some shaping, a little more waiting, plus an hour in the oven, so its presence at the dinner table is unlikely that same evening.  But it will be ready for breakfast. 

This waiting is important. My main complaint about homemade bread is that it often produces angular irregular slices when cut that call to mind the jagged coast of Maine.  From there is it easy to end up with sandwiches that look like a madman with poor attention skills made them (I am not naming names). Letting the loaf sit overnight makes it much easier to slice.  The microbes in the starter also release compounds that help preserve the bread, so it lasts longer before going bad.

All that aside, it is delicious, as most sourdough breads tend to be.  The crumb is toothsome and chewy.  Adding a little whole grain flour offers a slightly more complex flavor, but you can still get good results without it—so do not plan a special trip to the grocery store. Regardless, it will be bread of finest quality that still allows you to interact with friends.

It is not made quickly, but most of the work is done while you are outdoors living your very best non-reclusive life. Eating homemade bread that tastes good feels both life sustaining and affirming in the moment. Which I suspect is the allure of climbing a very big, dangerous mountain too.  Luckily, baking at sea level is enough for me.

Sourdough Bread

Adapted from Sam Sifton of The New York Times with some guidance from Tartine Bread by Chad Robertson

Ingredients:

  • 325 grams (2⅔ cups) bread flour
  • 100 grams (¾ cup plus a tablespoon) spelt (or whole wheat) flour
  • 6 grams (1 teaspoon) kosher salt
  • 180 grams (¾ cup) fed sourdough starter (see night before instructions)
  • additional flour for dusting
  • handful of oats

Instructions:

the night before

Feed the starter.  This involves replacing part of the starter with roughly an equal portion of flour and water.  See here for more technical additional instructions.  I usually discard two-thirds of the starter during the feeding. (For instructions on how to make pancakes with your discarded starter click here.) Allow about 8 to 9 hours for your starter to grow before prepping the dough.

the day of

In a large mixing bowl, combine the flours and salt.  In a medium bowl, combine the fed starter with 300 grams (about 1¼ cups) lukewarm water—stir until fully combined. Pour into the bowl with the flour and mix until just combined.

Cover with plastic wrap and then with a kitchen towel; let sit for 11 to 12 hours. (During this time it will double in volume and become light and puffy.)

Place the kitchen towel on a table and dust with a very generous amount of flour (no need to dust the whole towel, just a large circle where you intend to place the dough).  Use more flour than you think you need, it helps prevent the dough from stickin to the towel.  Dust the surface of the dough with a little flour. 

Using flour-coated hands, pull the dough out of the bowl and onto the floured towel.  Take an edge of the dough and pull it up and towards the center of the dough. Continue with the next section and repeat until you form a round loaf. (This will take five or six sections until you have worked all the way around the dough.)

Then gently roll the dough so that the seam is on the bottom by taking the section near you and wrap it up and over while gently rolling the rest towards you. The top of the dough should be the smooth side, with the seam underneath.

Gently cover the dough with the edges of the kitchen towel (be sure your towel is big enough to cover the whole loaf so no area of the dough is left exposed).  Let rest for about 2 hours (it will roughly double in size).

Thirty minutes before you intend to bake (usually 1½ hours after the shaping) set the oven to 500 degrees and place a Dutch oven or roasting pan with a lid in the oven to preheat.  (Be sure what you use has parts that will safely withstand high heat—I have one of those speckled Granite Ware roasting pans.) This helps to trap enough moisture from the loaf to expand and create a robust crackling crust. 

I also recommend scoring the bread, which you can do with a bread lame.  In all honestly, I have had better luck with new replacement blades for box cutters.  You can buy a whole box fairly cheaply—but use them at your own risk.  Whatever you decide to use, have it nearby when you are ready to put the loaf in the oven.  (Alternatively, you can forgo scoring the bread.  You will still have a very nice loaf, but the scoring helps the bread fully expand in the oven.)

When you are ready to bake the bread, carefully remove the hot pan from the oven and take off the lid.  Scatter some oats on the bottom of the pan.  Gently peel the loaf from the towel and place it, seam side down, into the hot pan. 

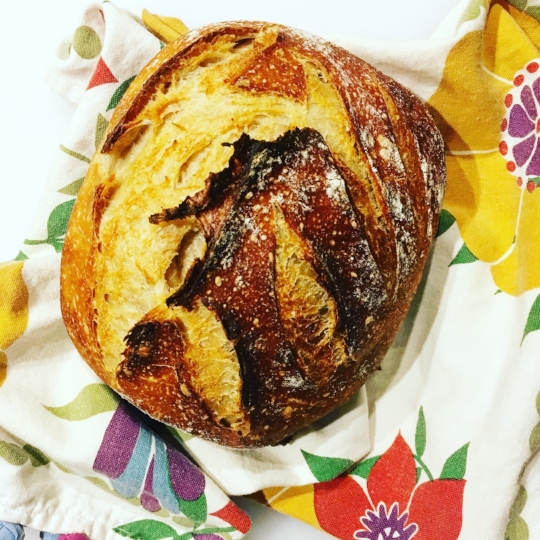
Working quickly, score the bread if you are doing so. I often make a square with four cuts in the center.  For the loaf you see above, I made one long cut on the side and then four small cuts at an angle on the right.  Scoring bread is a process that takes time and I am still learning.

Place the hot lid back on the pan and lower the heat to 450 degrees.  Bake for 30 minutes then remove the lid and continue to bake for another 20 minutes or so, until the top is dark golden brown and chestnut in spots with a crackled crust.

Remove from the pan and allow to fully cool before slicing.  (I let mine cool overnight uncovered and slice in the morning.)

Makes one loaf

Note:

  1. Weight measurements are listed first because I bake using weight instead of volume measurements whenever possible.  Depending on how much flour I have I typically use 50 to 100 grams of whole grain.  The total weight should be 425 grams of flour.  

March 11, 2018 /Emily Gelsomin
sourdough, bread, no knead
For Herbivores
Comment

Golden Spiced Bread is Sometimes Sexy

May 29, 2017 by Emily Gelsomin in With Whole Grain, Breakfast

I have a friend who says being nauseated is a lot like being pregnant.  You either are or you are not.  There are no halvsies.  If you are feeling ill you will have very primeval thoughts about, say, a monkfish piccata dish you recently made. No one vomits with ambivalence and certainly not about a slippery to the touch fish that is described as having a “muddy brown color, mottled with lighter and darker brown speckles.”

I mention this because my intestines, while they technically work and thank god have not been operated on, are assholes. They have been since I was a teenager.  I am aware admitting this violates the one rule of food writing: you do not talk about innards.  The second rule of food writing: you do not talk about innards.

But this is not Bon Appétit.  So I will tell you that last Thursday night, after eating monkfish and drinking precisely one beer, I spent most of the early morning hours lying in a fetal position on my bathroom floor. Because my digestive tract is a delicate flower, or I likely had some form of food poisoning, or some combination thereof. 

Are you still with me?

The next day the only thing I could stomach—besides some lemon-lime Gatorade—was this cake. It is a very good recipe and I have made about five different versions of it, including one savory edition that included sun-dried tomatoes, which was a grave mistake.

Brett said that the dried nightshade rendition tasted like gingerbread that had taken a wrong turn.  Imagine it is Christmastime and you slice off a piece from a freshly baked loaf, intending to wash it down with some delicious eggnog, but instead of candied ginger or some brandy-soaked currants, you find embedded tomatoes.

It was not completely inedible, per se, but I would not recommend it. I also feel compelled to mention I come from a lineage where it is customary to save leftover tossed salad and eat the soggy vinegar-laden limp greens the next day. Suffice to say tomato gingerbread is not something I ever hope to taste again, and that is saying something.

The version presented today is much better.  It is a recipe I have been experimenting with for awhile, because I have a few gluten-free friends who deserve to eat quick breads like the rest of us.  It is also very low in fermentable carbohydrates called FODMAPs, which research indicates can worsen digestive woes, like the kind you might experience due to post-infectious irritable bowel syndrome. 

It also has a pleasing spongy texture and pretty burnt orange color thanks to the turmeric. Because it is not overly saccharine, you can eat it at any time of day, truly.  Plus it makes a fine first meal after a bout of food poisoning.

The original recipe calls it a “golden savory cake” which sounds very sexy, but is not entirely accurate unless you intend to make the bread for an enemy and add those sun-dried tomatoes. Otherwise, it still trends more sweet than savory, though not enough to label it as a cake and get away with it unscathed. Regardless, it is a very good blueprint.

I recently found it is further enhanced by adding a schmear of frosting, which negates some of my earlier assertions.  The frosting recipe I used comes from Kindred restaurant, where my good friend Justin is employed. Like most everything they seem to make, their cinnamon bun cream cheese frosting is the kind of thing the devil warns you about.

So there you have it.  Not the most seductive of food stories, but an honest one and a damn good recipe.  Plus something that anyone who has ever had food poisoning or a colicky colon can relate too, without ambivalence.

Golden Spiced Bread

Ingredients:

  • ⅓ cup (55 grams) plus 1 tablespoon (10 grams) rice flour, divided
  • 3 tablespoons (30 grams) potato starch
  • 2 tablespoons (15 grams) tapioca flour
  • ½ cup (60 grams) buckwheat flour
  • ¾ teaspoon kosher salt
  • 1 tablespoon (7 grams) ground turmeric
  • ½ teaspoon ground cinnamon (or allspice)
  • ½ teaspoon ground black pepper
  • 1 teaspoon ground coriander
  • ¼ teaspoon cayenne pepper (or chili powder)
  • 4 large eggs
  • ¼ cup (55 grams) maple syrup
  • 2 teaspoons vanilla extract
  • ½ teaspoon orange blossom water
  • 2 tablespoons (20 grams) olive oil
  • ¾ cup (170 grams) milk (see notes)
  • 1 teaspoon baking soda
  • 1 tablespoon (10 grams) apple cider vinegar
  • 2 tablespoons (20 grams) lemon juice
  • ⅓ cup (50 grams) pistachios, roughly chopped
  • ⅓ cup (50 grams) assorted dried fruit, roughly chopped (see notes)

Instructions:

Set the oven to 350 degrees.

Grease a standard loaf pan (9 x 5-inch) with a neutral oil, like canola oil. Line with a strip of parchment paper over the width of the pan, so that the parchment will hang over the sides a few inches. Grease the parchment with oil.

In a large bowl, sift together ⅓ cup rice flour, potato starch, tapioca, buckwheat, salt, and spices; set aside.

In a medium bowl, whisk together the eggs, maple syrup, vanilla, orange blossom water, and oil; set aside.

In a large measuring cup, add the milk, baking soda, vinegar, and lemon juice; whisk to combine. (It should froth.)

Pour the wet ingredients (both the egg and the milk mixture) into the dry ingredients and whisk just long enough until everything melds together and the liquid becomes the consistency of pancake batter.

Pour the batter into your prepared loaf pan and bake for 40 to 50 minutes or until golden brown.  The loaf is done when the top is firm and springs back when touched (because you are using gluten-free flour a toothpick is not a reliable indicator of doneness).

Makes one loaf (enough for about 6 thick slices)

Notes:

  1. Any milk (almond, lactaid, whole cow’s milk) could be used here.
  2. My favorite version so far has involved dried mixed berries (blueberries, strawberries, etc.) as the fruit of choice, but dried cranberries are also very nice.
  3. The original recipe uses almond flour instead of buckwheat, but almonds are higher in the type of carbohydrate that can cause digestive issues.  This is also true of the pistachios, so swap them for walnuts or pecans if you have a sensitive digestive system.
  4. I realize this is a long list of ingredients, but it ensures that you end up with a bread that no one can tell is gluten-free. (Feel free to leave off orange blossom water if you do not have it.)
May 29, 2017 /Emily Gelsomin
gluten free, bread, cream cheese frosting, low FODMAP
With Whole Grain, Breakfast

Dark Winter Rye Boule

March 15, 2013 by Emily Gelsomin in With Whole Grain

The past few days have felt like a week of Mondays, strung together.  I interviewed a worker on Misty Brook Farm on Sunday.  And the co-owner of The Wine Bottega on Tuesday.  Did a lot of writing.  Worked all week, like a regular human.  And cursed at the wind today because it was so cold. 

What I really want right now is for someone to do my dirty dishes and pour me a glass of wine. 
But that someone will have to be me tonight.  So I hope you will forgive me if I am curt.  

This pretty much sums things up: winter rye boule.  Because it is (still) winter.  But also because it is the hardy variety I bought from Misty Brook Farm.  Which they grow and mill themselves.

Some winter rye, a little molasses, hint of cocoa, and a bit of caraway seeds was all it took to transform everyday bread into a dense and lovely loaf to chase out the end of winter.  While many dark ryes rely on caramel coloring to get their hue, this version uses the cocoa and molasses to impart a chocolate tint that deepens as the bread bakes.

The recipe borrows from Jim Lahey’s no-knead method of Sullivan Street Bakery in New York City.  So you can mix it up the ingredients in a bowl on your counter.  And then clean the dishes.  Or do the laundry.  

Or, better yet, open a bottle of red.

Dark Winter Rye Boule

Ingredients:

  • 2¼ cups bread flour, plus extra for dusting
  • ¾ cup rye flour
  • ½ tsp active dry yeast
  • 1½ tsp kosher salt
  • 1½ cups cold tap water
  • 1 tbsp blackstrap molasses
  • 1 tbsp plus 2 tsp unsweetened cocoa powder
  • cornmeal, for the bottom of the bread
  • 2½ tsp whole caraway seeds, divided

Instructions:

the day before

In a large bowl, combine the flours, yeast, and salt.  (Start this process 15 to 22 hours before you plan to eat the bread.)  Fill a measuring cup (or small bowl) with the water and vigorously whisk the molasses and cocoa into the water until it turns dark brown.  

Add the liquid to the flour mixture and combine the ingredients using a rubber spatula until a sticky dough forms (it will be wetter than standard bread dough), add more water, if needed.

Cover with plastic wrap and let rise 12 to 18 hours in a warm, undisturbed spot.  During this time, the dough will double in size and become puffy.

the day of

To start the second rising of the dough, scatter a handful of cornmeal in the middle of a clean kitchen towel. 

Add 2 teaspoons of caraway seeds to the dough and, with floured hands, take it out of the bowl and gently stretch the dough by tucking the sides of the bread together to meet at the bottom (if it is too sticky to handle, add a little bread flour); continue this process until the seeds are fully incorporated and the top is smooth. 

Shape into a round ball.

Place the dough on the cornmeal, sprinkle the top with the remaining ½ teaspoon of caraway, and cover with the sides of the kitchen towel. Let the dough rest for 1 to 2 hours (until it rises slightly).  

30 minutes before you plan to bake the bread, set the oven at 475 degrees and place a 4 or 5 quart Dutch oven or roasting pan with a tight-fitting lid on the middle rack of your oven.  (Be sure your pan can withstand the high heat and avoid pans with plastic parts.)  Preheating the pan helps the dough expand rapidly to produce a chewy interior and a crispy crust.

After 30 minutes, take the pan from the oven and remove the lid.  Gently place the dough into the pan, cover it with the hot lid, and bake for 30 minutes.  

Uncover the bread and bake for another 15 to 30 minutes, until the top is golden brown and the bottom sounds hollow when tapped.  (If you are unsure, the internal temperature of the bread should be 190 degrees.)

Let cool fully on a wire rack before slicing (1 to 2 hours).

Makes 1 loaf

Notes:

  1. I baked this bread in a BreadPot, which I got for Christmas.  Make sure whatever you use can be heated up to 475.
  2. You may be able to find Misty Brook at the Somerville Winter Farmers' Market on Saturdays.
     
March 15, 2013 /Emily Gelsomin
bread, rye, whole grain
With Whole Grain

Copyright 2024