A Plum By Any Other Name

  • Stories
  • About
  • Recipes
  • Images
image1-2.jpeg

Sourdough at Sea Level

March 11, 2018 by Emily Gelsomin in For Herbivores

Learning how to bake bread is like wanting to climb a really big mountain.  You do it because it is there.  Because you can.  Because it is a challenge.  And also because you are a slightly insane person.

I have spent a good portion of my thirties refining how to make bread at home. For many years, I practiced a beautiful technique from Tartine that took all day.  Initially, it was romantic starting the process soon after the sun came up and eating it after the sun went down.  But this is really best suited for home cooks who do not like other humans very much, since it does not allow for much interaction outside of a rigorous yeast feeding cycle.  

I still use that recipe when I have the better part of a day to spare indoors.  It is excellent on wintry bomb cyclone days or when I do not want to leave my house (or shower).  But the older I get, the less time I am typically willing to part with tending to sourdough and sticky countertops as the rest of the world spins on. So, mostly, I use an alternative method, with some techniques borrowed from the recipe that time forgot.

My approach comes from The New York Times by way of Jim Lahey of the no-knead bread fame. Lahey initially got me into making bread because it was easy. His original recipe calls for dry yeast, but my acquisition of sourdough starter about five years ago left the no-knead version defunct. Sam Sifton has since adapted it using natural leaven and this has been life changing.

We have access to a variety of freshly baked loaves and many okay factory-sliced breads, so no one should be faulted for saving precious minutes buying bread instead of baking it.  But paying five or six dollars for a decent loaf seemed outrageous, given a sack of flour costs about as much. So I set out to make bread with minimal life disruption.

There is a good deal of sandwich-making in our household these days.  Peanut butter on toast is cheap, filling, and nutritious.  (Please do not contact me if you are morally opposed to gluten, I am not.) We go through a lot of bread and so having a regimen is helpful.

I have learned that if I feed the starter at bedtime and take five minutes to mix the dough in the morning before work, it is sated with carbon dioxide when I get home.  The loaf still requires some shaping, a little more waiting, plus an hour in the oven, so its presence at the dinner table is unlikely that same evening.  But it will be ready for breakfast. 

This waiting is important. My main complaint about homemade bread is that it often produces angular irregular slices when cut that call to mind the jagged coast of Maine.  From there is it easy to end up with sandwiches that look like a madman with poor attention skills made them (I am not naming names). Letting the loaf sit overnight makes it much easier to slice.  The microbes in the starter also release compounds that help preserve the bread, so it lasts longer before going bad.

All that aside, it is delicious, as most sourdough breads tend to be.  The crumb is toothsome and chewy.  Adding a little whole grain flour offers a slightly more complex flavor, but you can still get good results without it—so do not plan a special trip to the grocery store. Regardless, it will be bread of finest quality that still allows you to interact with friends.

It is not made quickly, but most of the work is done while you are outdoors living your very best non-reclusive life. Eating homemade bread that tastes good feels both life sustaining and affirming in the moment. Which I suspect is the allure of climbing a very big, dangerous mountain too.  Luckily, baking at sea level is enough for me.

Sourdough Bread

Adapted from Sam Sifton of The New York Times with some guidance from Tartine Bread by Chad Robertson

Ingredients:

  • 325 grams (2⅔ cups) bread flour
  • 100 grams (¾ cup plus a tablespoon) spelt (or whole wheat) flour
  • 6 grams (1 teaspoon) kosher salt
  • 180 grams (¾ cup) fed sourdough starter (see night before instructions)
  • additional flour for dusting
  • handful of oats

Instructions:

the night before

Feed the starter.  This involves replacing part of the starter with roughly an equal portion of flour and water.  See here for more technical additional instructions.  I usually discard two-thirds of the starter during the feeding. (For instructions on how to make pancakes with your discarded starter click here.) Allow about 8 to 9 hours for your starter to grow before prepping the dough.

the day of

In a large mixing bowl, combine the flours and salt.  In a medium bowl, combine the fed starter with 300 grams (about 1¼ cups) lukewarm water—stir until fully combined. Pour into the bowl with the flour and mix until just combined.

Cover with plastic wrap and then with a kitchen towel; let sit for 11 to 12 hours. (During this time it will double in volume and become light and puffy.)

Place the kitchen towel on a table and dust with a very generous amount of flour (no need to dust the whole towel, just a large circle where you intend to place the dough).  Use more flour than you think you need, it helps prevent the dough from stickin to the towel.  Dust the surface of the dough with a little flour. 

Using flour-coated hands, pull the dough out of the bowl and onto the floured towel.  Take an edge of the dough and pull it up and towards the center of the dough. Continue with the next section and repeat until you form a round loaf. (This will take five or six sections until you have worked all the way around the dough.)

Then gently roll the dough so that the seam is on the bottom by taking the section near you and wrap it up and over while gently rolling the rest towards you. The top of the dough should be the smooth side, with the seam underneath.

Gently cover the dough with the edges of the kitchen towel (be sure your towel is big enough to cover the whole loaf so no area of the dough is left exposed).  Let rest for about 2 hours (it will roughly double in size).

Thirty minutes before you intend to bake (usually 1½ hours after the shaping) set the oven to 500 degrees and place a Dutch oven or roasting pan with a lid in the oven to preheat.  (Be sure what you use has parts that will safely withstand high heat—I have one of those speckled Granite Ware roasting pans.) This helps to trap enough moisture from the loaf to expand and create a robust crackling crust. 

I also recommend scoring the bread, which you can do with a bread lame.  In all honestly, I have had better luck with new replacement blades for box cutters.  You can buy a whole box fairly cheaply—but use them at your own risk.  Whatever you decide to use, have it nearby when you are ready to put the loaf in the oven.  (Alternatively, you can forgo scoring the bread.  You will still have a very nice loaf, but the scoring helps the bread fully expand in the oven.)

When you are ready to bake the bread, carefully remove the hot pan from the oven and take off the lid.  Scatter some oats on the bottom of the pan.  Gently peel the loaf from the towel and place it, seam side down, into the hot pan. 

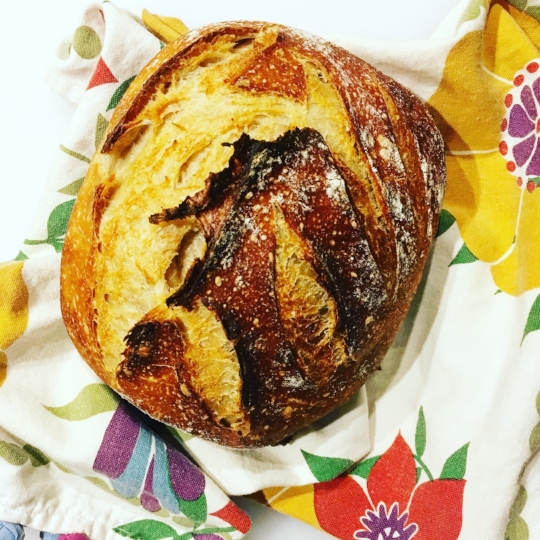
Working quickly, score the bread if you are doing so. I often make a square with four cuts in the center.  For the loaf you see above, I made one long cut on the side and then four small cuts at an angle on the right.  Scoring bread is a process that takes time and I am still learning.

Place the hot lid back on the pan and lower the heat to 450 degrees.  Bake for 30 minutes then remove the lid and continue to bake for another 20 minutes or so, until the top is dark golden brown and chestnut in spots with a crackled crust.

Remove from the pan and allow to fully cool before slicing.  (I let mine cool overnight uncovered and slice in the morning.)

Makes one loaf

Note:

  1. Weight measurements are listed first because I bake using weight instead of volume measurements whenever possible.  Depending on how much flour I have I typically use 50 to 100 grams of whole grain.  The total weight should be 425 grams of flour.  

March 11, 2018 /Emily Gelsomin
sourdough, bread, no knead
For Herbivores
Comment
IMG_8326.JPG

Kale Pesto Pasta: An Ode to Weeknight Cooks

January 27, 2018 by Emily Gelsomin in Eat Vegetables, For Herbivores

There is a quiet ingenuity to making a meal on a weeknight, which can easily go unnoticed to those who surface just as the pasta is placed on the table.  Even when one likes to cook, dinner on a Tuesday is more about survival than the faraway pleasures of a leisurely Sunday cassoulet.

There is also a lot of labor involved, it just isn’t usually apparent. It starts with a working knowledge of the pantry status quo. This information gets filtered through preferences of the eaters and includes, perhaps, a quick viability scan for lunch leftovers.  Nutritional merit can award or subtract stars depending on who is at the table.

The menu may become altered after factoring in the affairs of one’s bank account or the time available to procure necessary ingredients and execute before the eaters get restless and the cook starts to fantasize about drinking a cold glass of gin.  All of this eventually, miraculously, gets extracted into a singular meal that slips into the parameters of the evening, all the while treating the brain like it is a card catalogue for 30-minute meals.  Unless one is awarded the luxury of being able to stay at home, this mental jujitsu is done at work. And it has to be done every day.

This does not even address the skills required to actually cook something edible.  It is not a glamorous job, nor it is one for weaklings.

I mention all of this as a testament to how underappreciated this labor—traditionally defined as women’s work—tends to be. I do not mean to suggest that men do not partake.  There are certainly heteronormative households wherein the man is in charge of most of the cooking.  But given that it is my job, more or less, to conduct daily ethnographies on household cooking responsibilities I find more often than not, women are still responsible for the majority of meals. I think this contributes to the lack of prestige. 

It can be a thankless job for even passionate cooks.  These are not meals that most sane individuals would describe as fun to commandeer, when it is one out of one million responsibilities for the day. 

Despite all the calculating, the weeknight cook can still feel bad about the results.  The broccoli was too firm, or not firm enough, or too salty, or not appropriately seasoned. Yet, when responsibility defaults to the deputy cook, these meals may get subcontracted to outside businesses or factory processing—and tend to include little to no broccoli.

Broccoli is more work.

Which is where this recipe comes in.  It does not feature broccoli or, worse, a side salad—which to me is like attempting to debone a chicken on a Tuesday night.  Too much effort for too little reward when work looms in the morning.  But it does include kale, which only takes a minute or two to clean the leaves and cut out their sturdy middle ribs. 

The protein content is fairly low and if that is irksome add some chickpeas or pair the sauce with one of those legume-based pastas, which I tried one night (featured in the photo).  The result was edible, but eating pasta made from beans and pea protein made me feel a little out of place, like I was wearing a fedora in the kitchen.  I will stick to gluten moving forward.

Anyway, this is really a sneaky salad recipe for those who are not above vegetable bribery.  In exchange for the pleasure of eating pasta, one is also awarded a scant half pound of kale. It can easily be made on a weeknight, which is also a joy for fellow cooks who bristle at the thought of having to squat and fish out the salad spinner from a bottom cabinet. 

It ensures vegetables make an appearance at dinner and does not award extra dirty dishes in the process.  The recipe produces a creamy, slightly vegetal sauce that is a brilliant shade of moss green.  I am happy to report that it is unique enough from regular pesto to be its own enjoyable thing. 

I don’t have an answer to how we, as a society, can elevate the importance of weeknight cooking, but I do have a response for dinner.  And it ends with eating kale in quick and quiet pleasure.

Kale Pesto Pasta

Adapted from The New York Times Magazine courtesy of Tejal Rao and Joshua McFadden

Ingredients:

  • ¼ cup extra-virgin olive oil
  • 2 cloves garlic, slightly smashed and then peeled
  • 1 to 2 bunches of lacinato kale (about 12 ounces)
  • ½ pound uncooked pasta
  • ⅛ teaspoon chili flakes (I use a smoked variety, see notes)
  • freshly ground black pepper plus salt, to taste
  • ¾ cup Pecorino Romano, plus more for garnish (to taste)

Instructions:

Bring a large pot of salted water to boil over high heat.

In a small skillet over medium-low heat, add the olive oil and garlic cloves.  Cook until the garlic starts to smell fragrant and turn light golden, about 3 or 4 minutes.  (You will need to watch carefully to ensure the garlic does not burn.)  Remove from heat and set aside.  (If the garlic continues to cook and threatens to get dark brown and burn, remove it from the oil to stop its cooking.)

Wash the kale leaves and run a knife down both sides of the thick stem on each leaf to remove the rib; discard all ribs. 

When the water is boiling, add the kale leaves and cook until they turn dark green and are just tender, about 4 to 5 minutes.  Using tongs, pull the kale leaves out of the pot and into a blender.  They will be dripping with water and that is okay—the small amount of hot water will help create the sauce.  Add the pasta to the still boiling water.

Add the garlic and oil to the blender with the kale.  Add the chili flakes plus a few cranks of black pepper and a couple generous pinches of salt.  Blend until the mixture is thick and fully pureed.  Taste and adjust seasoning, adding more salt and pepper as needed, and then blend again. (If the mixture is too thick and won’t fully puree, add a little hot water from the pot. Take care not to add too much, I found it can mute the flavor.)

When the pasta is fully cooked, scoop it out of the pot using a slotted spoon and into a serving bowl.  (I found this method carried enough water to help meld the sauce and the pasta, so it didn’t require reserving more pasta water to add.  Alternatively, you could reserve a little water before draining the pasta into a colander.)

Toss the pasta with the sauce (adding the reserved pasta water, if necessary).  Add the Pecorino.  Top with extra cheese, if desired.

Makes enough for two or three people as a main course

Notes:

  1. The original recipe calls for one pound of kale, but I found that my grocery store reduced the size of their bunches and buying two bunches of kale for one dinner, which was twelve ounces all said and done, felt like enough
  2. You will need to taste and season at least a few times.  The recipe will be bland until you add enough salt.
  3. I usually reserve about ¼ cup of extra sauce that the pasta doesn’t need and use it as a spread for sandwiches—it could easily be blended with mayo too.
  4. I love these smoked chili flakes from Daphnis and Chloe, they add an almost meaty quality to otherwise vegetarian dishes.
January 27, 2018 /Emily Gelsomin
kale, pesto, pasta, weeknight
Eat Vegetables, For Herbivores
Comment
IMG_8186.JPG

A New Year with Butterscotch Blondies

December 31, 2017 by Emily Gelsomin in Dessert

I lost my humor this year. Lost it like you might lose an old jar of capers to the back corner of the fridge. Its presence never actually left, but at some point the function became questionable.

I let fear win and started worrying.  I worried about nuclear war, cancer, the stability of banks, about the Constitution, botulism, and my aging ovaries.  My physical body revolted.

I developed a shellfish allergy.  Started occasionally vomiting without cause.  Got melanoma.  Then gave myself a hernia for Christmas. Ta-dah!

During this time I slowly stopped cooking.  Testing a new recipe or baking something with sugar in excess of American Heart Association guidelines—undertakings I once loved—became inconsequential.  I turned inward. A fear of dying replaced daily reminders that I was still very much alive.

I was a walking corpse with a nine to five. Except on some days that corpse would muster up a panic attack.  The harder I tried to bulletproof my life the less it became worth saving.

A few months ago I finally got some professional help.   I think everyone can benefit from analyzing the thoughts bouncing off our reptilian brains.  I also recommend remembering to breathe, which involves letting your stomach out against all societal cues that suggest the opposite.

Not everyone can go to therapy, nor do those au courant high-waist pants assist with diaphragmatic breathing. So I will share some other things that have helped along the way too.

Listening to Tara Brach and On Being, especially this episode with Maira Kalman.

Watching my favorite author give life advice.

Considering a cautionary tale of internet justice about the potential pitfalls of texting with A.I.

Reading about death and Woodbridge Sauvignon Blanc.

Plus reuniting with this classic, released the year before I graduated high school.  I should have listened to it more.  (Trust me on the sunscreen.)

Brett has been helping out and cooking more, as well.  He makes a beautiful pasta dish that puts those forgotten capers to use. May they never again get sent to fridge purgatory.

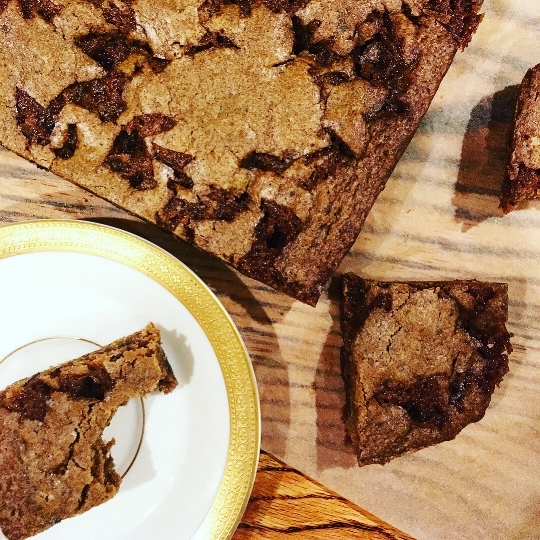
I also recently returned to my oven.  In the process I found a new recipe from Violet bakery in London that has quickly become a classic.  It is a quintessential blueprint for blondies, but they require that caramel glass is created, then broken and scattered over the batter before baking.  The shards sink during the time in the oven and create little pockets of butterscotch that look like sugary ice crystal shadows from above.

IMG_8187.JPG

The first time I made them using dark muscovado in place of golden brown sugar.  I also decreased the chocolate requirement roughly in half.  Most of the bars I have come in 2½ ounce slabs and sacrificing one felt like enough.  (It was.) It is not worth the trouble of making caramel to have it swallowed by cocoa.

Despite the modifications, there is still a very liberal reliance on sugar, so the salt in them provides a necessary balance.  I highly recommend using a dark brown variety.  It offers a hint of molasses like that in British black treacle.  When I made them again with a lighter shade of sugar, I found the taste a tad sweeter and the flavor a little less interesting.

Which is a nice reminder.  Life can be scattered with shards, caramel or otherwise, but often the the best bits come from deviating a little off the path.

IMG_8188.JPG

Violet Bakery Butterscotch Blondies

Adapted from The Violet Bakery Cookbook by Claire Ptak, courtesy of Orangette

Ingredients:

for the caramel shards

  • 2 tablespoons water
  • 150 grams (¾ cups) sugar

for the batter

  • 250 grams (1 cup plus 1 tablespoon) unsalted butter
  • 2 eggs
  • 300 grams (1¾ cups) dark muscovado sugar (see note)
  • 1½ teaspoons vanilla extract
  • 240 grams (1¾ cups) all-purpose flour
  • 1¼ teaspoons baking powder
  • 1¼ teaspoons kosher salt
  • 70 grams (2½ ounces) dark chocolate, cut into small chunks
  • 70 grams (2½ ounces) caramel shards (recipe ingredients above)

Instructions:

for the caramel shards

Line a baking sheet with parchment paper.

In a small saucepan, combine the water and sugar and cook over medium-low heat until the sugar starts to dissolve. Raise the heat to medium and cook until it becomes chestnut-colored.  Do not stir at all in the process or risk crystallizing the mixture, which will make it grainy.

Pour the caramel on the baking sheet in a thin layer.  Lift and tilt the sheet to ensure that the caramel spreads evenly out.  Let cool completely.

Lift the parchment out of the baking sheet and onto a cutting board and cut the caramel into irregular shards with a study knife, making sure that the pieces have a perimeter no bigger than three-quarters of an inch.

Divide the batch in half and place into freezer-safe containers or bags and store in the freezer until ready to use.

for the blondies

Set the oven to 320 degrees.  Grease a 9 x 13-inch baking dish with butter then line it with parchment paper.

In a small saucepan, melt the butter on medium heat; set aside to cool.

In a large bowl, whisk the eggs, dark sugar, and vanilla until thoroughly combined; whisk in the melted butter.

In a medium bowl, sift together the flour, baking powder, and salt; add to the egg mixture and stir until almost combined. Add in the chocolate and stir until just combined.  (No specks of flour should remain at this point, but avoid overmixing.)

Pour the batter into the prepared pan. It will be thick.  Gently spread and smooth it to the edges.  Scatter the caramel shards on top.  Bake for 30 to 40 minutes, until the top is fully set and the edges start to get wrinkly and slightly browned. 

Let cool completely in the pan then run a knife around the edges to loosen the sides.  Grasping the edges of the parchment paper, remove the cookie slab.  Cut the cookies into rectangles. 

Store in an airtight container for up to three days or freeze.

Makes about 16

Notes:

  1. The caramel shard recipe makes enough for two batches of cookies.  I would not recommend trying to half the recipe.  Instead, just plan to make another batch soon.
  2. If you cannot find muscovado sugar, substitute dark brown sugar.  Light brown will also work in a pinch.
December 31, 2017 /Emily Gelsomin
Violet Bakery, butterscotch blondie, caramel
Dessert
Comment
  • Newer
  • Older

Copyright 2024