A Plum By Any Other Name

  • Stories
  • About
  • Recipes
  • Images
Tostones.jpg

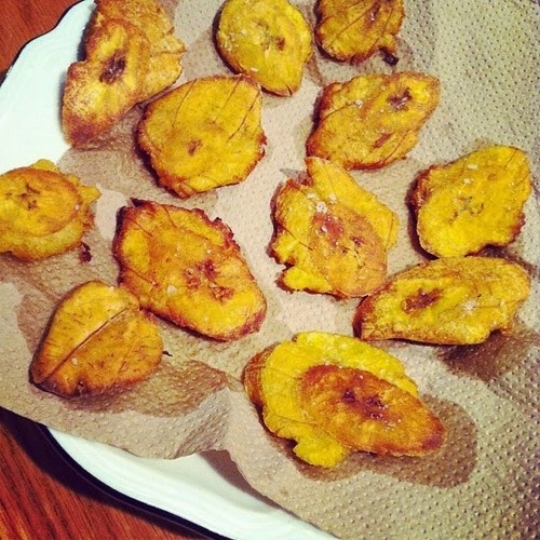
Tostones: Slice, Soak, Fry, Smash, Fry

September 01, 2014 by Emily Gelsomin in Eat Vegetables, For Herbivores

As far as I can tell, there are a few helpful rules to follow when having company for dinner.  Salty pig parts rarely disappoint.  Dessert should be mandatory, for both hosts and guests.  And if you can fry something without making your companions feel as though everyone has entered the seventh circle of hell, you will be a champion.

Frying food is not easy.  It is violent.  Hot oil gurgles and bubbles and erratically catapults towards the stove, the walls, your eyes.  Always the eyes. 

I went through a phase in my twenties when I fried a lot of sad, white fish.  Tilapia was very cheap.  I was broke. Amazing what a saltwater soak, some Tabasco, and a double dip in flour could do. 

Though one time I served this fish camouflage with slightly raw insides to an old boyfriend’s family and everyone ate very quietly and politely while I melted into the carpet. Luckily, no one died.

The point is, I have the recipe written down somewhere in a splattered kitchen notebook.  It is worthy of company.  And I have not made it in over five years.  Because frying things—and I like to think I am not alone here—usually makes me feel like hell.

But this is not the case for all.  For instance, if you are a certain hot-blooded Puerto Rican, you might set down a plate of sexy fried things looking like you’ve just woken from a nap in a meadow.  Which is what happened when my friend Thais and her husband Dave invited me over for dinner a few months ago. 

Appropriate rules were followed.  They served a big, brilliant plate of bacon rice studded with peas and carrots and seasoned with culantro sofrito.  Collectively, dinner guests pillaged a quart of coconut ice cream.  And Thais taught me how to make tostones, and made it look effortless.

In truth, tostones really aren’t really a nefarious endeavor.  There is some oil splattering, to be sure, but no breading to deal with.  And the risk of involvement from the Centers for Disease Control is incredibly low.

They are made from green plantains, which are like starchy bananas.  Tossing them in oil makes them irrationally more redeemable than French fries—though just as addictive.  Essentially, you slice, soak, fry, smash, and fry again. 

And then you eat with a mayo or sour cream-based condiment of choice. Thais has childhood roots in mayo and ketchup.  I’ve fiddled with the addition of chili garlic sauce and lime.  Some minced fresh oregano would be lovely too, I’m sure.

Don’t let the sauce or the splatter deter you.  They can be made without too much difficulty.  You too can avoid the inferno.

Tostones

Ingredients:

  • 1 large garlic clove, minced
  • kosher salt
  • 3 green plantains
  • canola oil (enough to fill an inch or so up the sides of a pan at least 10 inches wide and 3 inches deep)
  • coarse sea salt (kosher works in a pinch)

Instructions:

Prepare a large bowl of water (temperature does not really matter, just not too hot or cold).  Add in the garlic and a few pinches of kosher salt. 

Take one plantain and, with a sharp knife, slice the peel lengthwise, cutting into the peel but not the flesh.  Cut two more lengthwise slits at equal intervals so the peel is segmented in three places (this will make it easier to remove).  Wedge your thumb under between the peel and the flesh of the plantain and gently slide it down to remove each section of the peel.  Repeat with the remaining plantains.

Cut the plantains into ½ inch diagonal slices and toss them into the seasoned water; let sit for at least 10 minutes or up to an hour. 

When you are ready to fry, pour the oil into a large, deep pan; fill at least 1 inch deep and heat on medium high.  (The oil is ready when it sizzles when a piece of bread is dipped in.)

Set in as many slices as you can without overcrowding the pan.  Turn them over when their bottoms turn bright yellow and start to get crispy; repeat with the other side (this will take about 3 minutes per side). 

One fried on both sides, place the slices on a large board and repeat with the remaining slices. 

After the first frying, use the bottom of a sturdy glass to press down heavily to smash each slice. 

Dip the smashed slices in water, press a few bits of salt on one side, step back to avoid the splatter, and then fry the slices again on both sides until crispy and golden (1 to 2 minutes per side). 

Makes about 15 or 20 tostones

Notes:

  1. This can be done with more than 3 plantains, but the amount listed is enough for 3 or 4 people to have as a snack.
  2. For this you do not want the yellow, ripe plantains; they’ll be too sweet.
  3. These are best the day they are made, but they can be warmed in 350 degree oven for 5 to 10 minutes.
September 01, 2014 /Emily Gelsomin
tostones, Puerto Rico, fried vegetables
Eat Vegetables, For Herbivores
cuc sandwiches.jpg

Cucumber Cream Cheese Cilantro Sandwiches, for Now

November 17, 2013 by Emily Gelsomin in For Herbivores, Eat Vegetables

I am in a bit of a sinkhole at the moment.  

I am researching the role of pasta in post-unification Italy for my final paper this semester.  I am also recovering from making the world’s worst pudding on Friday night.  And if I am truly being honest, I did not fair much better attempting a chocolate poppy seed krantz cake on Saturday.  Though, I did learn if your dough only slightly rises you can turn krantz cake into "rugelach." 

What I really want to do is sit down with the Sunday Times, have a mangled krantz-rugelach with a cup of coffee, and stop time.  But a paper on pasta in Futurist-Fascist Italy is not going to write itself.

Which is why I am bringing you cucumbers in November. 

This is one of my all-time favorite sandwiches.  They are perfect for summer, which is when I first made them. (Dave and I smuggled them onto the Downeaster to Portland a few months ago.)  They are also quick, and so they fit in any old time.

The ingredients hardly require a garden in our age of the supermarket.  It is also worth mentioning if you make any of Jeni’s ice creams—and are bagel-deprived—you’ll need a use for the leftover cream cheese.  (Here is one of my favorite recipes using her lovely base.)

So allow me to introduce the cream cheese cucumber sandwich, of which I am ideological fan.  In reality those two need some spunk to get me excited about consuming them in tandem.  The chili garlic sauce, cilantro, and capers come in to make the magic happen.  You will also want a really good sourdough or nutty multigrain bread because the outsides are as important as the insides when crafting a sandwich.

Which we have the luxury of securing.  Because—thankfully—this is not fascist Italy.  This is post-ice cream New England, with sandwiches.

Now back to the twentieth century.

Cucumber Cream Cheese Sandwiches with Chili and Cilantro

Ingredients:

  • 4 ounces cream cheese
  • 2 tbsp capers, roughly chopped
  • 10 to 12 cilantro sprigs, stems and leaves finely chopped
  • 1 scallion, finely chopped
  • black pepper and salt to taste
  • about 1½ tbsp chili garlic sauce, divided
  • 1 cucumber, sliced
  • slices of bread (I recommend sourdough)

Instructions:

Combine the cream cheese, capers, cilantro, and scallion; taste and adjust seasoning.  Spread a little of the mixture on each piece of sourdough (about a tablespoon).  

Place a few slices of cucumber on one slice of bread and spread about a tsp of chili sauce on the other.  Combine sides.  

Slice and eat.

Makes 3 to 4 sandwiches

Notes:

  1. Instructions are based on one sandwich.  The number of sandwiches will depend on how thick you spread it.
November 17, 2013 /Emily Gelsomin
cucumber, cilantro, sandwich
For Herbivores, Eat Vegetables
zucchini.jpg

Mom's Zucchini Appetizers

August 08, 2013 by Emily Gelsomin in For Herbivores, Eat Vegetables

I’ll bet you once had a childhood.  And during that time you probably did some snacking.  And I’d wager you likely have a few foods that you haven’t eaten in a good fifteen or twenty years, but if you saw them today, for a moment, you might forget all the nasty bits of growing up.

Maybe it’s those twin popsicles—the kind with the double sticks that came in a big translucent bag to clearly boast the flavors it held.  

Or maybe your pick is a bit more unusual, like boxed pistachio pudding, in which case, you were probably a strange little child, and we likely would have gotten along very nicely.

My sister was a pigs-in-a-blanket fiend.  In her presence, party trays would leave the kitchen half demolished.  I stalked the chips and dip bowl and would not leave until the French onion dip was taken down. 

Unless a little something my mother called “zucchini appetizers” was prepared.

These were admittedly an odd snack caught somewhere between a crustless quiche and a bouncy bread pudding, of a savory sort.  I loved to eat them cold and to this day, they still taste like summer.  If summer could be mixed with Bisquick® and cubed.

You can probably see where this is going.

I was thumbing through my mother’s recipe book awhile back and came across these square zucchini snacks of hers.  Though ten-year-old Emily was thrilled, the Bisquick presented a challenge.  These days I’m not one for premade pancake mix, so I had to indulge my very adult snobbery and find a proper substitute.

Luckily, the Internet is brimming with do-it-yourself Bisquick people.  And after a few trials, I had pretty much replicated the appetizers.  I decreased the garlic, because it gives thirty-year-old Emily dyspepsia.  And added basil because I believe basil can be added to pretty much anything.  And just did what I was told on mom's recipe card:

Mix all ingredients.  Spread in a greased casserole. Bake until slightly golden on top.  Cut into bite-sized squares.  Serve hot or cold.

I only ever remember ever eating them cold.  And bite-sized by the handful.

Mom's Zucchini Appetizers

Ingredients:

  • 1 cup all-purpose flour
  • 1½ tsp baking powder
  • 1 tsp salt
  • 4 eggs
  • ½ cup olive oil
  • 1 whole scallion, minced
  • 1 small garlic clove, finely minced
  • ½ cup grated parmesan cheese
  • 3½ cups grated zucchini (about 3 small zucchini)
  • ⅓ cup roughly chopped fresh basil leaves
  • pinch of red pepper flakes
  • a few turns of fresh black pepper

Instructions:

Set the oven to 350 degrees.  In a large bowl, sift together the flour, baking powder, and salt; set aside.  In a medium bowl, lightly beat the eggs and then add in the remaining ingredients and stir to combine; mix the wet ingredients into the dry ingredients until just combined.

Butter a casserole dish (I used a 10 x 7).  Pour the mixture into the prepared dish and bake until the eggs have fully set and the top is golden brown around the edges, about 40 to 50 minutes. (If you are using a larger casserole pan, the time may be less.)

Makes about 12 bite-sized squares (or 6 as part of a meal)

Notes:

  1. The 1 cup of Bisquick® originally called for in this recipe roughly translates to 1 cup of flour plus 1½ tsp of baking powder, ¼ cup of oil, and ½ tsp salt.
  2. This also makes a very wonderful savory breakfast (particularly if you were a slightly odd child).
August 08, 2013 /Emily Gelsomin
zucchini, summer, appetizer
For Herbivores, Eat Vegetables
  • Newer
  • Older

Copyright 2024